
Everyone is interested in some things more than others. You enjoy certain topics, subjects, music, stories, even colors and flavors that others do not. The things you lean towards most make up the unique person that you are. And while unique as you may be within your group of friends and family there are still many people who share similar interests as you. Finding this group with similar interests is very important in the world of marketing, we call it “target marketing”. While target marketing doesn’t have to be about shared interests, I believe the most successful marketing is when you do happen to share the same interests (verses those who market solely for the purpose of making money).
Here is a partial list describing myself that makes me unique:
General
- Wife
- Mother
- Sister
- Daughter
Faith and Convictions:
- Christian
- Torah keeper
- Conservative
Personality
- Happy
- Optimistic
- Realist
- Curious
Home and Business
- Homeschooler
- Entrepreneur
- Business Owner
- Designer
- Developer
- Instructor/Teacher
Interests
- Organic
- Natural living
- Country life
- Self sustaining
- Education
Business Goals or Dreams
- Grow my business to include a staff of wonderful graphic designers, web developers and a marketing team.
- Create my own homeschool curriculum focusing on History, Geography and Survival
- Publish a family magazine online and in-print focusing on our faith, education and self sustaining topics.
The list could really go on as you can see. But focusing on this list helps me narrow down my goals and “target market” to others who share similar interests which ultimately produces better financial results and a job I truly enjoy. Staying focused and using lists for reminders can also help you in design and in marketing your products as well.
Lesson Activity: Creating a Digital Art Collage
In today’s lesson you’ll learn about layers and how to move these different layer pieces around while creating your own digital art collage. So let’s begin! Start by writing down a 10-20 bullet point list of the kind of person you are, the things you enjoy, things you would like to do and maybe even some future business goals.
Our many different characteristics, goals and interests are basically layers of the type of person we are. With a list we can find what interests and goals have higher and lower priority and we can adjust them to focus on what matters most to us. Same is true with digital art layers. When we use layers we have the freedom to move our interests or image priorities up or down, here or there.
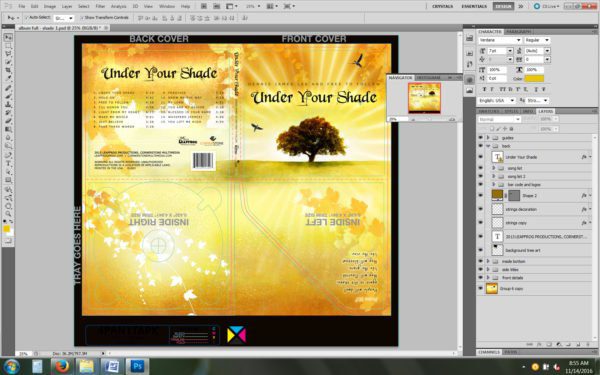
The following is a screenshot of a CD project I worked on for a client showing many different layers.
Notice on the right there are folders with items under them like text, colors, images and sub-folders. These items are often referred to as layers. Can you see the sub-category folders under the main category called back? Sub-folders open and close and help me separate the items by specific areas, helping me stay better organized. I use SOOOO many layers in my projects. I would go nuts if I did not create folders and sub-folders to separate them. By having these layers created I can move the album title “Under Your Shade” from the right of the page to the left, I can also make it hide behind the tree or turn it upside down. It’s easy for me to create copies of the pretty leaf background images and flip them here or there. If I did not use layers I would not have this freedom or flexibility to try out new angles. I would be left very frustrated and would likely waste a lot of time trying to start a new project every time I needed a simple adjustment. Layers are great for making those small or even big adjustments very quick and easy! Here is a quick video to help better explain:
So let’s begin to work with layers!
Project Steps
- Begin your collage by collecting images that help express the kind of person you are based off of the list you previously put together. The collage could include stock images, magazine cut-outs that you scan into the computer, family photos or even pictures you’ve taken with a digital camera, tablet or phone. They can be photos of people, places, favorite animals and innumerable things.
- Copy or cut out the parts of each image that are important to you and save them using a different name as a new transparent (png) image. (See video guide in previous lesson)
- Start a new Photoshop project and make your image size: 4500×4500 pixels. It’s a pretty big size which is useful for professional printing purposes. You may find that you like your project so much that you want to print it out as a poster or place it on a postcard or mug and give it as a gift to someone you love.
- Give your Photoshop project a name you’ll remember such as “Made To Be Unique Collage 1” and save it in a place easy to find on your computer.
- Place your cut out images into your new Photoshop project by dragging and dropping.
- Move the images around where you like them the most. (See video guide above explaining layers and moving them around)
- Save your work often. You can use Control and S for a quick save.
- Finally Save your work as both a PSD file and a large jpg file with no compression. You want the best quality possible.
Please Note: This could be a LARGE and amazing project! Take it slow and easy and practice the skills we’ve already reviewed such as finding quality stock images, cutting images out, deleting backgrounds, using your pencil, brush and eraser tools. Spend quality time better understanding these tools during this project. If it takes you a few days or weeks, that’s okay. Some people take longer in their projects than others because they want to understand and do a good job. So be patient with yourself if you’re not going as fast as you would like to go, it’s okay, enjoy your time and your project! ?
Quick Lesson Link Reminders
- Crop and Deleting Backgrounds
- Learning How to Fade and Blend
- Text On and Under Stock Photos
- Using Pens, Pencils and Brushes
Struggle is Normal!
Please keep it mind that it is completely normal to struggle in order to make things work out right, or fit the collage just so. And it’s okay if this turns out to be a project you have to come back to and work on over time, some projects are like that. Sometimes certain photos do not fit into the picture the way you would like it to fit. You may decide you’d like to try something else out to fit the collage better, or perhaps a different photo angle or a clearer shot. Lighting and contrast can also affect the overall look of a project. These subjects will be covered in up-coming lessons as well.
Wrapping Things Up
After you’ve created your collage, resize the image and give it a new name, as shown in my Image Size and Compression Guide (remember not to delete your larger size document, you may need that later on). Then consider sharing your collage with some family or friends. You’re welcome to share your project with me as well. I’d love to see what you’ve created!
Target Marketing
Earlier in the lesson I mentioned target marketing. So now I challenge you to review your finished collage and consider who would be your primary “target market” if your image was placed on a product. Would it be fun loving middle-aged women who love pink and purple? Or, maybe young men hooked on electronics, pit bulls and renaissance figurines?? Consider what type of people would most likely be interested in your finished product. They are considered your “target market”. We’ll cover more about target marketing in up-coming courses.
Stay tuned for more and practice, practice, practice!
Daily Activity Challenge: Either work on perfecting one amazing collage as best as you can over the next week or two OR do smaller collage projects every day for the following week.









 Please