Have you ever heard the expression, “Don’t muzzle the ox“? It’s another important standard in life and in the world of freelance design that I would like to address. What we’re talking about here is strengthening your morale, taking care of your needs, fueling your interest and even giving you energy as you work on professional projects over time. Let’s get down to the nitty-gritty, what it really covers is compensation, you being paid for your time, your skill level and the extra effort in what you produce.
While most believers are very charitable and giving they too have needs, they all need to eat, drink, have shelter over their heads and pay their bills. So at some point in time they have to be compensated for the work they provide. Even Paul addresses the human need for workers to be compensated, whether on the missionary field, at home with the kids, on the job miles away or even in the living room, on the computer doing cool digital art projects (wink). We all need some form of compensation.
Deuteronomy 25:4, “You shall not muzzle an ox while it treads out the grain.
1 Corinthians 9:9 For it is written in the law of Moses, “You shall not muzzle an ox while it treads out the grain.” Is it oxen God is concerned about? Or does He say it altogether for our sakes? For our sakes, no doubt, this is written, that he who plows should plow in hope, and he who threshes in hope should be partaker of his hope.
Let’s keep in mind that this course is directed at the prospect of helping you design products for small business purposes, whether you want to learn how to create products to sell or how to provide graphic design services for hire on an hourly wage basis.
In the future I will be providing marketing courses to show you just how to let the world know about your talents and/or your custom designed products. I’ll show you how to reach a much broader audience of potential future clients and also help show you how to increase your earnings potential and hourly wages! I will include valuable resources on where you can advertise your products and services as well as how to get your designs on actual products for sale at no cost to you. So keep your eyes open for those helpful marketing classes yet to come!
Quick research activity on graphic designer wages
Don’t take my word for it… Do some research and find out what others are saying. Google search the following keywords: hourly rate for graphic designer and see what others are saying about graphic designer pay rates.
Read through several web pages and write down your observations. What is the most common rate you see graphic designers being paid? If someone is sharing how much they get paid then see if you can browse their website and portfolio to get an idea of the quality they provide in their graphic designs. It is healthy to observe the variety of skills others offer and how they market them. Research is always great for setting goals for yourself as you become a quality graphic designer. You’re welcome to browse through my website and portfolio for inspiration or ideas as well.
How to find the right rate to charge your clients is to start small and work your way up. Most importantly gather together a portfolio of projects you’ve worked on over time, display them in a beautiful website gallery, include as much positive feedback (widely known as testimonials) as you can from clients or people you’ve worked for. Marketing your work well through strategic search engine optimization and social network marketing will also increase your wages to a more desirable hourly rate. As you build up your portfolio you’ll build up customer confidence to such a degree that you’ll have to raise your prices in order to handle the increased demand. lol. So yes, getting a more desirable higher income is very doable, but it takes a lot of work, planning and proof!
My personal experience with digital art when it comes to charity and compensation…
I personally love doing charitable project designs and have done this on many occasions over the years, so I certainly encourage you to help freely whenever you can. However, it’s also important that you keep your priorities, your needs (or your family’s needs) and even your morale in mind. In some cases consider offering forms of trade or reduced rates when an opportunity arises. Trade is always encouraged as far as I’m concerned as it boosts morale and gives all people involved dignity and value including you, the artist.
When trade is not an option then help where you can but always consider your priorities and make sure you’re not spreading yourself out too thin in your efforts to help others. Again consider the ox grazing in the field as it works, the compensation gives the ox energy and inspiration to do more and to go further.
Video Guide: Resize and Compress Images
When should you consider “muzzling the ox”? Answer: when posting images online for the sole purpose of earning an income! If you post your largest image sizes online you’ll certainly be giving the grain to some other ox and potentially kill your morale and earning potential dramatically. That is unless your intentions are to share your full size photos and digital artwork freely in the public domain. So then, let’s practice reducing your image size and resolution. You can use the video as a guide or the pictures and information below to help walk you through.
Walk-through: How to reduce your image size and compress it
Many photo editing software tools have similar functions to Photoshop. Give it a try and see if you can reduce the image size easily with the photo editing software you currently have on hand.
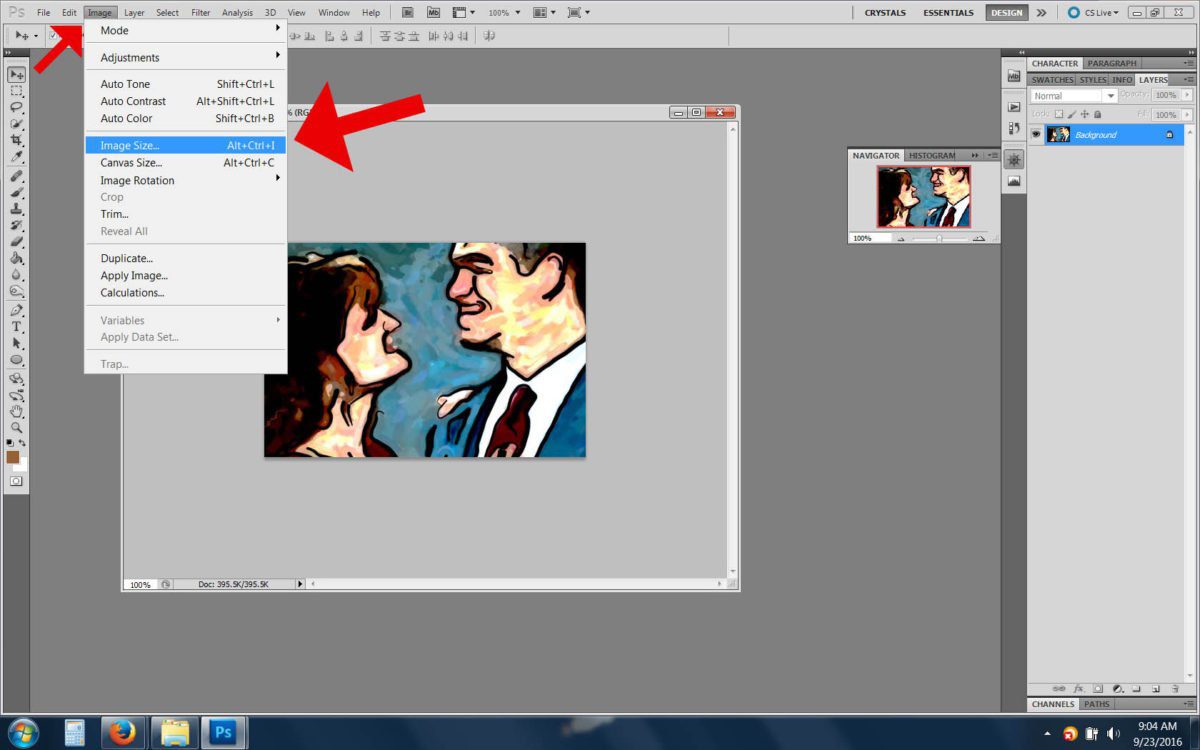
First click Image (because you’re going edit the whole image)
Then select Image Size
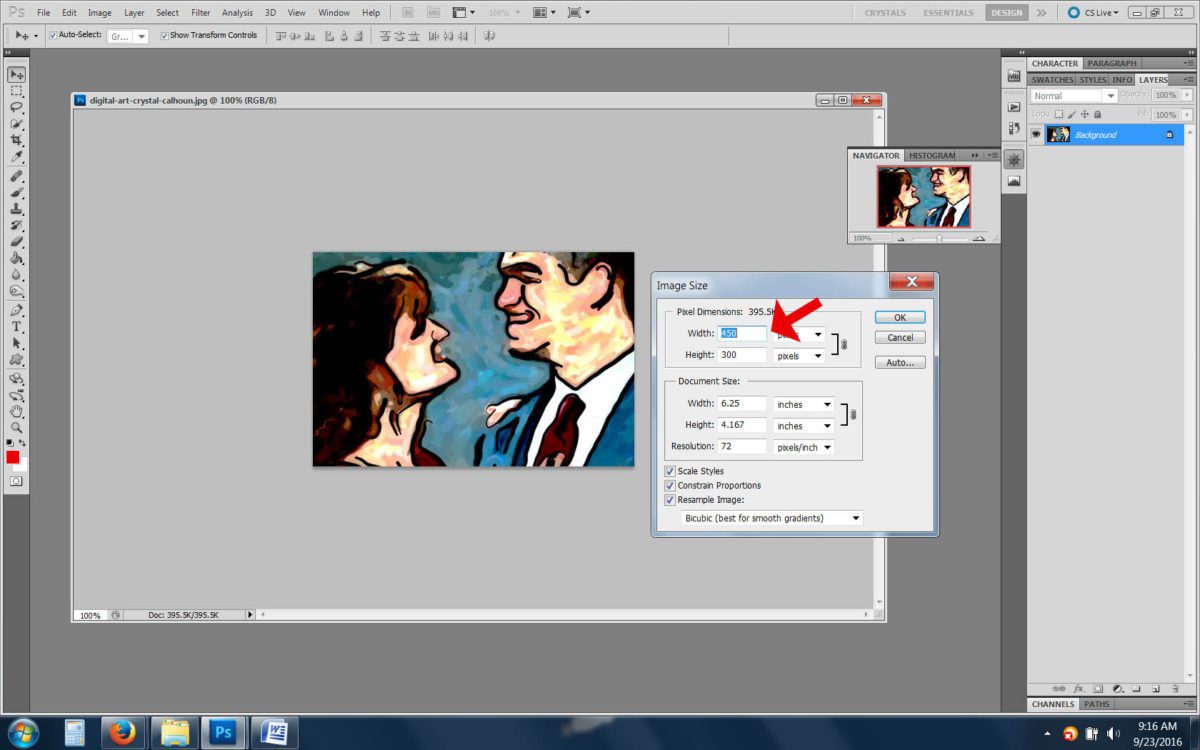
Now you can change the height and width at the same time. Notice I have 450 pixels. I’ll just type in 100 pixels and then click Okay and it will resize the picture for me, adjusting both height and width equally.
STRONGLY consider giving it another name when you save your work so that you do not lose the awesome freedom that having a large photo brings. Large un-cropped and unedited photos are the best to keep on file in case you have a future plan or use for them… whether in print or for online use.
So, let’s save the image, and reduce the file size so that it’s a smaller and compressed image.
- Under the File tab click “Save As”
- Give your newly sized image a new name. You can have the same name and just add the image size to the end of it if you like. For example here I might call my image: digital-art-crystal-calhoun-100.jpg (these strong key words will help me find my images later on when I need them)
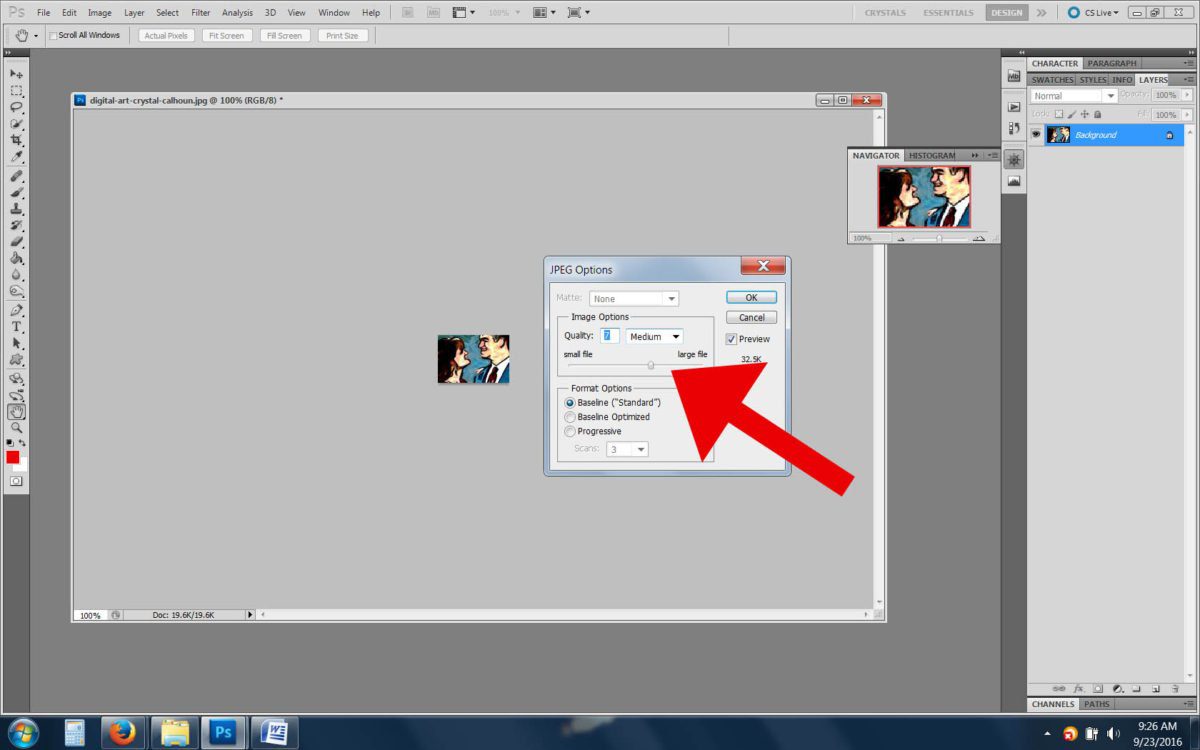
- Next, reduce the image size as you see in the picture below. You have the option in Photoshop to change the quality by low, medium, high, maximum. Or you can move the bar below and get the desired file size there instead. I usually use the bar and look at the image size to the right (see the file size under the Preview check box? That’s what I keep my eye on. It’s good to have the image as low as possible without messing up the quality. Sometimes it doesn’t really matter how fuzzy an image is so a much lower quality is just fine. Other times like in a website homepage image you want to have a higher quality image AND have it somewhat compressed. What I do in that case is usually use about a high quality #8.
Play around with the file size and quality until you get the desired results. Once you become familiar with the process of editing image sizes you’ll find it a REALLY fast process.
Lesson Activity:
Find a large photo that you would like to share with others and reduce it first. Follow the instructions above. Keep in mind the finished, resized photo needs to be a clear picture, large enough for people to see and understand BUT at the same time not too big. Personally I think anything over 1MB is getting too large to share in an email to your friends and family. After you’ve resized and compressed your image send your photo off, share it with a friend or family by email or on your website if you have one. And then ask them if they liked the size you made the image to be, ask if they thought the file was too large, making it a long download or too large to view in the monitor window.
Many companies will use a width of 750 pixels wide x 600 pixels high in their newsletters. So it’s a size worth trying out.
The best way to get better at anything including photo editing is by simply trying, sharing and getting feedback from others on how you’re doing. Be willing to take constructive criticism from others without getting your feelings hurt. This can be hard sometimes but it will ensure you become the best in whatever you do.







 Please